Have you ever noticed that your furnace tends to stop working just when you need it the most? This is not just bad luck! When your furnace is working hard in especially extreme cold conditions, it is easy for your pilot light to go out or other common furnace problems to occur. In fact, it is more likely that you will see all kinds of furnace and heating issues in bad weather as your furnace strains to keep up. You can prevent some of this, however, through regular maintenance from your heating & air conditioning service team. Still, not all furnace problems can be prevented, and there will likely be times when it will be helpful to know how to light a pilot light.
Thankfully, learning to light a pilot light is relatively easy. Follow the steps below to learn how to light a pilot light. Keep in mind, however, that more complicated pilot light or furnace issues should be left to HVAC professionals, as there is a significant risk of damage or injury from gas furnaces.
How to Light a Pilot Light
- Prepare safely: The first step to any DIY furnace project is to practice good furnace safety. In particular, you should make sure there are no flammable materials around when you follow these steps to light a pilot light. Similarly, you should locate everything you need, including a long lighter and the instructions for how to light a furnace pilot light on your furnace, before getting started. Read the instructions carefully before you begin.
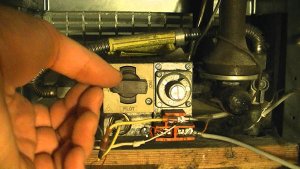
- Find the pilot light: Next, it is important to locate the pilot light for your particular furnace. You may find this information in the instruction manual for your system listed under how to light the pilot light. In most furnaces, the pilot light is usually located near the bottom of the furnace and is labeled with “pilot”, “on”, and “off”.
- Turn off the gas: The next, and most important safety step, is to turn the pilot light to “off” and wait at least five minutes before proceeding. Waiting five minutes allows the gas to dissipate enough to avoid causing a fire. Make sure you turn the knob fully to the “off” position and do not continue if you think there may still be gas around. While you wait for the 5 minutes, locate the “reset” button, which should be near the “off” setting on the knob.
- Relight the pilot light: Next, turn the knob to “pilot.” Then, hold down the reset button and bring a flame towards the pilot light opening. Once you see a small flame and know the pilot is lit, hold the reset button down for one more minute, and then you can turn the knob to “on”. With that, you now know how to light a pilot light.
When to Call in a Professional
If you follow these steps to light a pilot light and still have trouble keeping your heat on and the pilot light lit, it is time to call in a professional HVAC system maintenance company to investigate the problem. Similarly, if the pilot light goes out regularly or you think something else may be wrong with your furnace besides the pilot light going out, contact a professional.
Find Out More About Lighting Your Pilot Light
If you want to learn more information about an issue with your pilot light or with your heating & air conditioning system in general, give us a call at Galmiche & Sons. We have been serving St. Louis and the surrounding areas since 1950, and we look forward to helping your family stay warm this winter.